Well I'm back after my long break with my first post for the month for Memory Maze.
Tea Bag Holder
To begin to make this 3 section Tea Bag Holder you will need to cut each of the pieces out of chipboard sheets. I have included all of the details in the first few pictures for you. The measurements are all in millimeters (mm).
 |
| One Back Panel (154mm * 200mm), Three Inside Back Panels (160mm * 50mm each) and Three Ramp Supports (38mm * 50mm each) |
 |
| One Outside Lid piece (80mm * 170mm), Two Inside Lid pieces (68mm * 152mm each), One Base section (103mm * 160mm) and a Front Plate piece (30mm * 156mm). |
 |
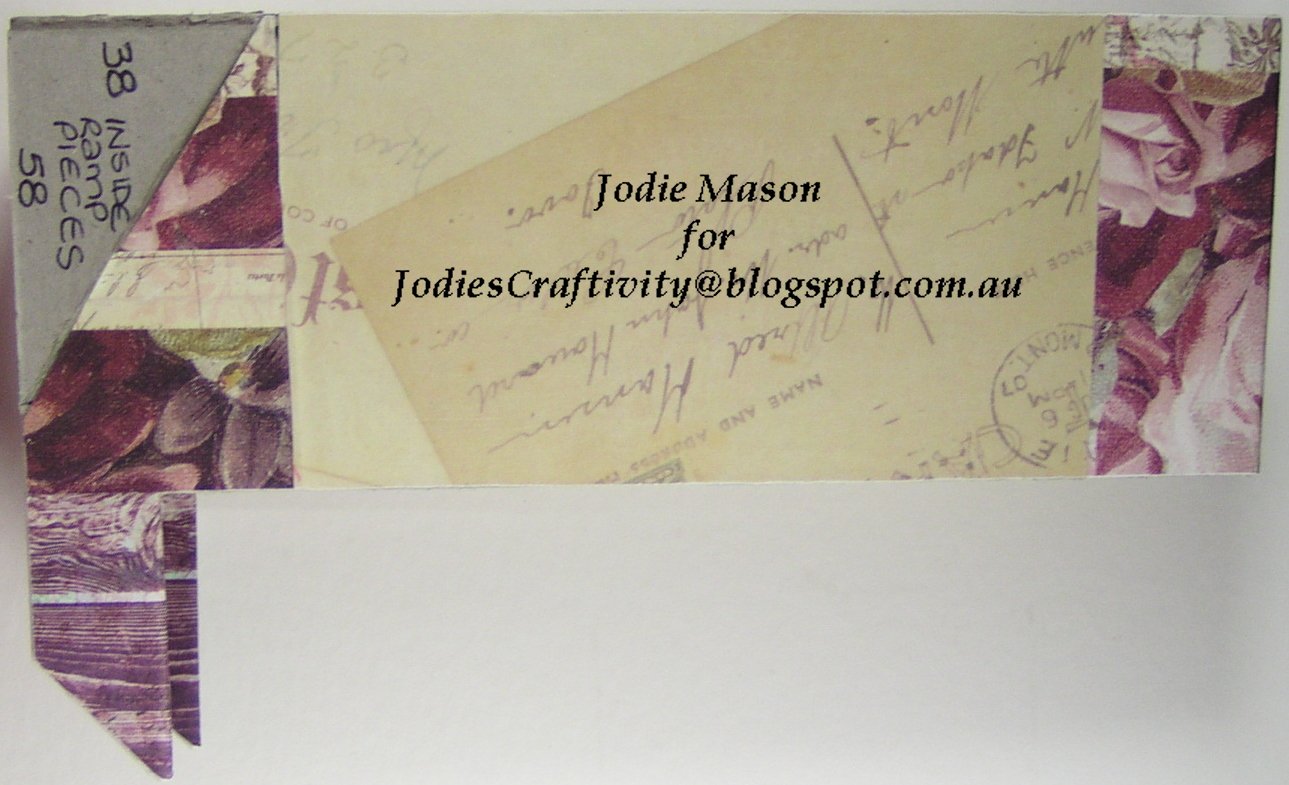
| Three Ramp sections (50mm * 71mm each), Two Inside Panels (120mm * 197mm each) and you will need Six Inside Ramp Pieces (the triangular sections seen in the right lower corner of this picture) (58mm * 38mm each). One of these Inside Ramp Pieces gets stuck to both sides of the Inside Panels. |
 |
| One Outside Front Panel (154mm * 177mm) and Three Front Inside Panels (50mm * 177mm each). NOTE: I did end up increasing the size of the cut-out windows to about 36mm wide and 20mm high for the Three Front Inside Panels. |
 |
| Two Outside Side Panels (200mm * 123mm) and Two Inside Side Panels (118mm * 197mm). The Two remaining Inside Ramp Pieces get stuck to the inside of the Two Outside Side Panel pieces as shown on the far left. |
Please keep in mind that some of these measurements may need to be tweaked slightly depending on the width of the chipboard that you are using. I have also used some leftover pieces of paper that I had remaining from another creation. The few larger pieces that I had have been used to cover the main (outside) pieces, with scraps used to cover the other pieces. All papers were stuck to the chipboard using Gel Medium and then once stuck down had another 2 coats of it applied over the top to seal it.
Let's break it down into sections to make it easier to work with.
The inside back section:
I began with the 3 inside back panel pieces. The papers for these were the same width, but slightly longer than (by about 20mm) the chipboard pieces as can be seen in the following pictures.
TIP: I actually cut all of my papers a little bit bigger than the pieces and once they are stuck down and dry either cut or file down the unwanted excess. This way your chipboard pieces are always covered completely.
 |
| Inside Back Panel pieces (inside section) |
 |
| Inside Back Panel pieces (outside section). The overhang has been stuck down at the top. |
The base and outside back section:
 |
| The Back Panel and Base Panel with markings to show where the inside pieces will sit. I have also marked in dotted lines the placement for the beads which I used as feet. For the feet I came in 10mm from all sides and then divided the remaining space by the number of feet you have. |
Start by sticking your paper onto the Back Panel making sure to have some overhang on each side with the most at the top. Cut the corners out of the top overhang so that the paper is in line with the edges of the chipboard. Fold the top over to the inside and stick it down. Place a bead of glue along the bottom of the Back Panel and stick this to the back of the Base Panel. I have used a few pieces of double sided tape to keep it in place while it dries. Stick the overhang from the Back Panel to the underside of the Base Piece. Stick the paper to the Base Panel leaving about 10mm on the front and both sides unstuck. Make sure that you have excess paper on both sides, but any excess on the front or back can be removed. You can also glue down the two outside Ramp Support pieces into position on the Back Panel.
 |
| An outside view of the Back Panel attached to the Base. |
I have pocked holes through the Base where the feet were to go and slipped jewellery headpins through the pearls and the holes to the inside of the Tea Bag Holder. The ends of the headpins were bent to lay flush with the Base and glued in place with some Glossy Accents.
 |
| For feet I used some large pearl beads and headpins. |
The back lots of headpins can lay to the sides as this area will be hidden under the Ramp Sections.
 |
| The inside view of the headpins holding the feet in place. |
With the front lot of headpins I have stuck these down fairly straight as only paper will cover these.
 |
| The inside view with all of the headpins stuck down in place. I have used some double sided tape to hold them in place while the Glossy Accents dried. |
The inside section:
These have been covered in paper on both sides, with the papers folded over the sections that will be showing at the top. It is not necessary to cover the areas where the Ramp Supports are.
 |
| Side view of the covered Inside Panel. |
Once the Two Inside Panels have been covered you can glue the remaining Ramp Support between them at the back. TIP: You may want to use a scrap piece of chipboard cut to the same size as the ramp support and place this between the two panels at the front. This will enable you to put an elastic band around them to keep them in place while the glue dries.

For the Inside Base Section you will need a piece of paper that measures at least 185mm * 165mm. On the reverse side of this I have worked out the placement for all of the pieces (as can be seen in the following picture). Allow at least 75mm for the 3 Ramp pieces, 40mm for the Base piece, 2 lots of 31mm for the Front Panel and the extra gets glued down under the paper covering the Base. For the width you will need 154mm with some overhang available on both sides. Stick down the 3 Ramp Sections and the Front Panel piece as shown in the picture. Remove the excess paper from between the Ramp Sections and fold over and stick down the excess. Trim the excess that will be stuck under the paper at the base to 154mm. Fold the excess on both sides of the Front Panel over and stick down.
 |
| The placement of chipboard pieces on the Inside Base paper. |
 |
| The Inside Base paper from the other side. |
This Inside Base Section can then be glued to the Inside Panels firstly by gluing the Ramp Sections to the Inside Ramp pieces. I have once again used double sided tape to hold these in place while the glue dries.
 |
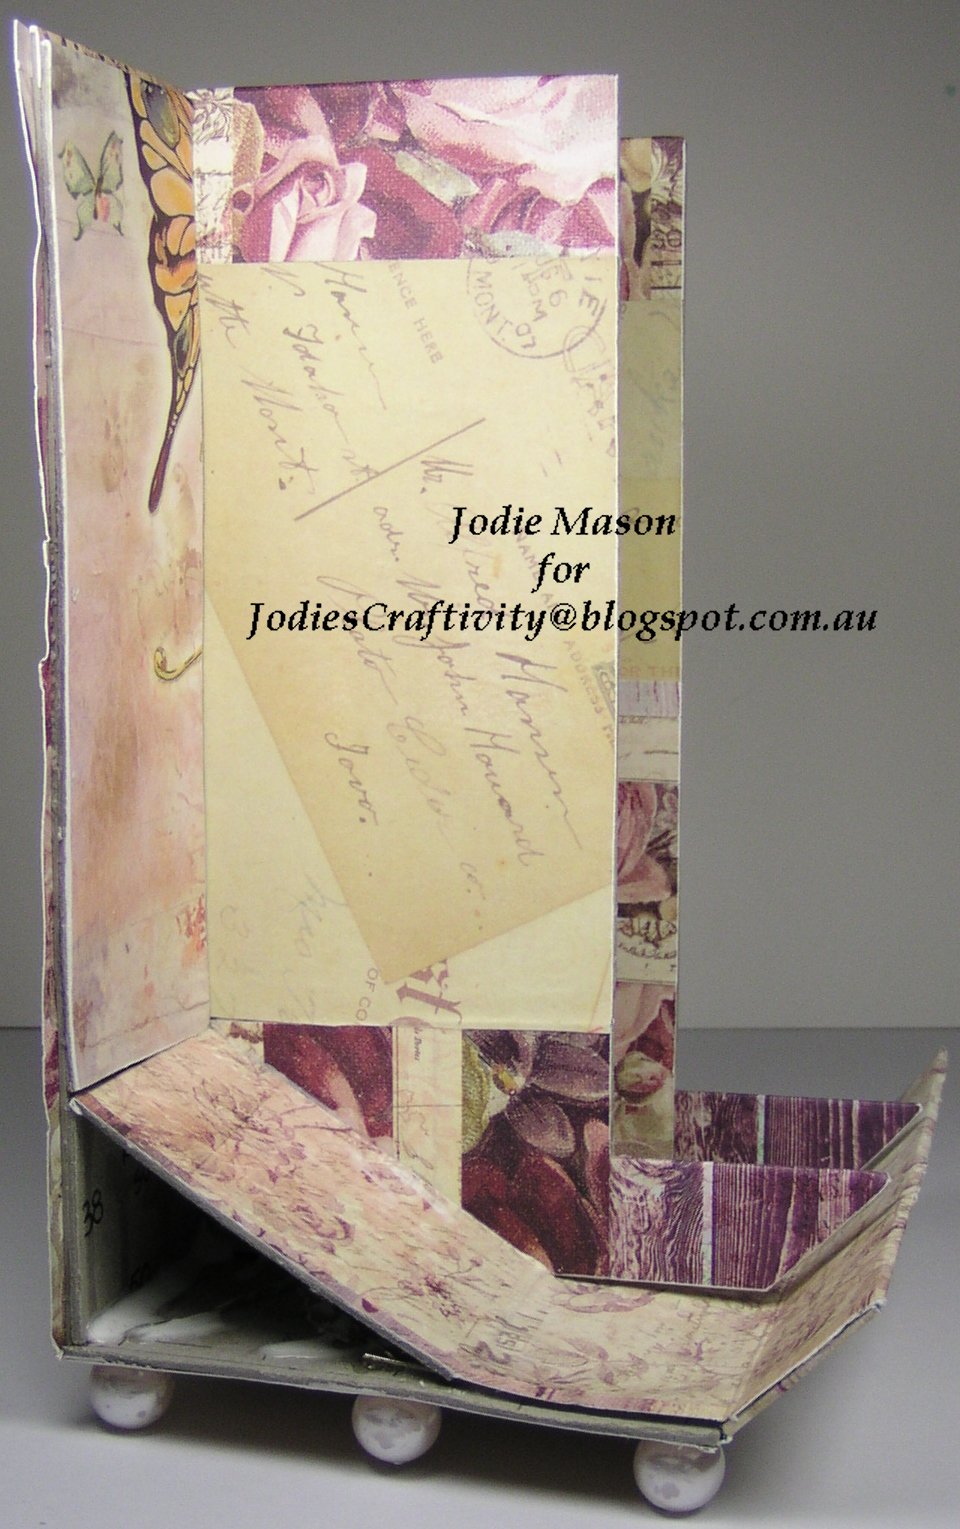
| A side view of the Inside Sections joined together. |
 |
| The rear view of the Inside Section. |
 |
| Another view of the Inside Section. |
The Front Panel can now be tucked under and glued to the other section of paper, so that both sides of the panel are covered.
Now to join the base/back sections and the inside sections:
To join these sections put glue along the back of the Inside Panels and slide the Inside Section onto the Base/ Back Section so that it fits between the 2 outside Ramp Support pieces. Glue the central Inside Back Panel into place. Glue the top of the Ramps to the Ramp Support Sections attached to the Back Panel. Put some glue over the Base where the paper will be sitting and glue the base of the Front Panel to the Base Section. Stick the excess paper under that of the Base Section and stick this down. Glue down the other 2 Inside Back Panels.
 |
| The Base/ Back Section and Inside Sections joined. |
 |
| View of the joined sections from the other side. |
 |
| Top view of the joined sections. |
 |
| Frontal view of the joined sections |
Place a bead of glue to the underside of the Inside Panel pieces and stick these to the Base and Front Panel pieces.
 |
| Side view of the completed Inside Section. |
 |
| Other side of the completed Inside and Base/ Back Sections. |
The outside side sections:
These need to be prepared in a similar manner to that of the Inside Panels. Paper should be stuck down to the inside of the Inside Side Panels and folded over at the tops (this includes the tray section). The remaining edges can have excess paper removed. Prepare the Outside Side Panels in the same way only you need to have a small excess at the base (this needs to be stuck under the paper covering the Base piece). The Inside Side Panels can be glued into place (along the base and back edges) of these panels. With glue along the same edges on the Outside Side Panels and also on the inside where the Inside Side Panels will stick to them, stick these down also.
TIP: I used clothes pegs, rubber bands and spare chipboard pieces to hold these sections in place while the glue dried.
 |
| A side view of the sections so far stuck together. |
 |
| Alternate view of the sections so far. |
 |
| Frontal view of the sections so far. |
Now for the front section:
The paper for the Outside Front Panel needs to be about 25mm longer and about 20mm wider than the chipboard panel. Stick this to the panel and make cuts to the paper as seen in the pictures so that it can be folded over and stuck down.
 |
| Frontal view of the Outside Front Panel. |
 |
| Back view of the Outside Front Panel |
I have used small pieces of acetate to cover the window panels, and have folded and stuck down the top and bottom excess papers. For the Inside Front Panels the paper should be about 10mm longer than the chipboard and the overhang folded over at the top.
 |
| The 3 Inside Front Panels. |
 |
| The other side of the 3 Inside Front Panels. |
These then need to be glued together.
 |
| The Front Panels glued together. |
Now for the lid:
The 2 inside chipboard pieces were stuck together and paper wrapped around them. The Outside Lid piece was prepared in the same way with paper wrapped around it. These were then all glued together.
 |
| The Outside Lid piece. |
 |
| The Lid pieces stuck together leaving a small gap at the back and a larger section at the front. |
The completed and decorated project:
The Inside:


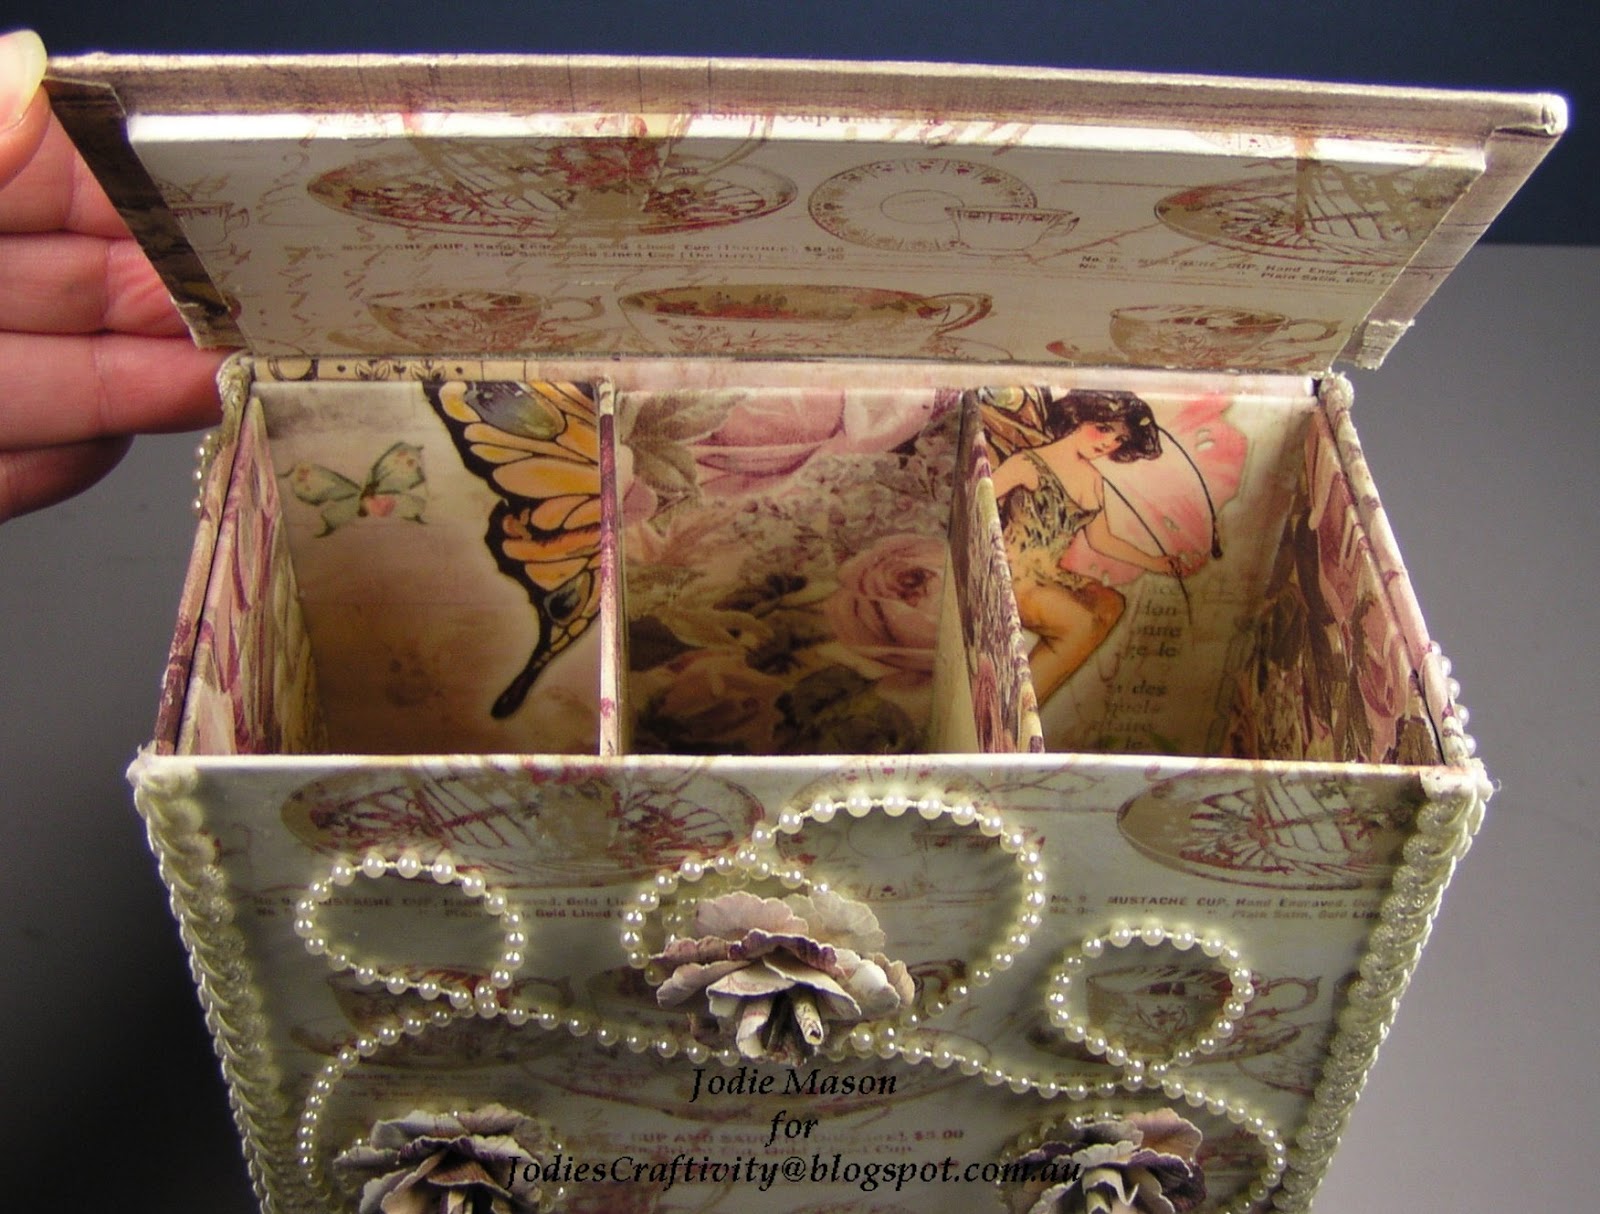
The Lid:


The Front:


The Back:

And The Sides:


Wow, that was a long post. Hopefully it wasn't too much for you and it was easy to follow along. I'd love to hear your thoughts on this creation/design and even better yet share your pictures if you do make one for yourself.
Until next time,
Keep Creating,
Jodie Mason.
No comments:
Post a Comment